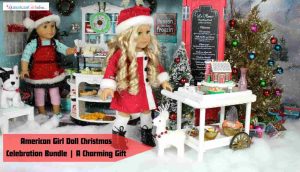
Isn’t the picture above just too cute?! I love it! It looks so good and it’s a such a close replica to Grace’s real Pastry cart. This DIY project is brought to you by Jenny owner and designer at Pink Princess Design. She did a fantastic job on this craft and she wanted to make sure anyone who wants to make their own had the information to do it themselves.
*Note-this project has a lot of good pictures but it is not a step by step tutorial.
Materials Needed:*Michael’s
Total cost about $35
- Scrolls Picture Frame
- Scroll Wooden Decals
- 2 Wooden Circles
- 2 Round Wooden scroll decals
- Cup Hooks
- Hot Glue
- Wood Glue
- Wooden Rectangles
- Wooden Dowels
Here is a great picture of all the materials needed to make the replica Jenny did. Of course, you can be creative and change a few things up a bit!
She spray painted the scrolls and picture frame to match Grace’s Pastry Cart.
For the wheels to attach to the cart AND to be able to spin, use two cup hooks on the bottom. Brilliant!
And the finished products looks perfect with all the treats in place and for only a fraction of the cost!
Have you made a replica of Grace’s Pastry Cart? Please leave a comment below with what you added or used!
25 Comments so far. Feel free to join this conversation.

Awesome! I am making my own version of Grace’s Pastry Cart and (Hopefully) it will be done soon! I am trying to make it more like your version though. And I am using whatever I have laying around to make it! I’m trying not to go to Michaels. Just eyeballing it is working out great for me! No need to go to the Craft Store for this project! Except one big thing: I don’t have Pastries for Grace. So I have to go to Michaels to get supplies for those, but that’s OK!

how do you make the pasteries?

I am making a tea cart for Samantha! Your ideas are great!!
Cute! I made Grace Pastry Cart! You can view it on my blog here:
https://clarascraftcorner.wordpress.com/2015/02/16/recreating-graces-pastry-cart/

Cute! Thanks for sharing!

Thank you, that’s so clever. I love it. I’m writing a shopping list and going to make it my own, somehow. Thanks again for sharing. I really appreciate the kick start. : D

I don’t see any directions for the handle. I can hardy wait to see your further explanations as you do one for yourself. Create on!

She used two L shape brackets and a drawer pull.

I made the bistro ser using tour ideas and al really happy with the results. The bakery turned lovely! What did she use forma the wall cabinet? I al doing the bakery and made a wall cabinet, but I don’t like how it turned out.
Could you please post the measurements, im going to Michaels in a couple days I would like to pick the stuff to make this, Thanks so much

I wasn’t given the exact measurements. The pictures should give you a pretty good idea of what to get.

And what are tow cup hooks?

Lol, misprint. Two cup hooks.

So cute! I just have to make this! What size are the wooden circles, frames, dowels, scrolls, and rectangle base pieces, and everything else?

Thanks for posting! Going to try this week to make it. Where did you get the tiny bird cage?
Can I ask what size are the wooden rectangles? The diameter of the wooden circles and what size was the picture frame a 5×7 or 8×10? Also what length did you cut the dowels? This is super cute thanks for sharing.

That is great!
Are you sure the materials are from Hobby Lobby? Aren’t they from Michael’s?

You are right, they are from Michael’s!

Wowwwww that looks toooo cute.
It looks fantastic! I want to know how to make the bakery cases too.
How much did it cost to make with what you used? I didn’t see it in the post, but I could have just missed it ?

It was about $25

That looks super cool!


February 2, 2016 at 5:02 pm –
AGAIN LOVE IT!!!!! SUPER COOL!!!! THATS ANOTHER REASON TOO GO TOO MICHEALS